Service Manager powered by HEAT
Working with Request Offerings
1.Log into the Service Desk Console.
2.Open the Request Offering workspace.
3.Do one of the following:
•Click New > Request Offering. The system displays the 1. Define request offering page.
Define Request Offering Page
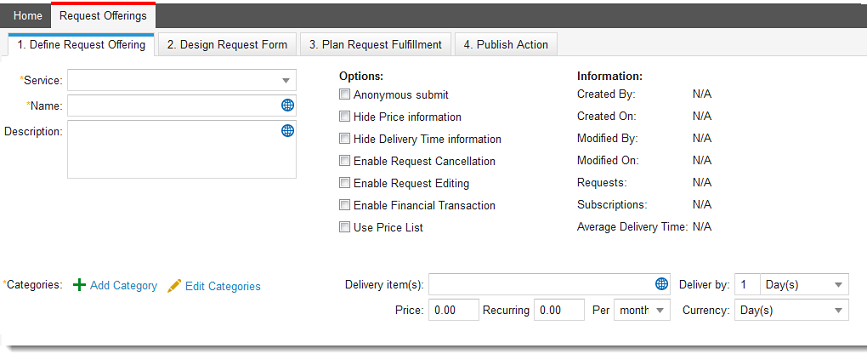
If the Service name appears as GUID, the service has been deleted or is marked non-published.
•Select an item to edit from the list. When editing an item, you can change any of the fields seen in Enter information into the fields.
4.Enter information into the fields.
| Field | Description |
|---|---|
| Service | The service for which the form applies. Select from the drop-down list. This list is populated from the Services workspace. |
| Name | A unique name for the service. |
| Description | Optional. A description of how the form is used. |
| Category |
The category determines where the request offering can be found in the Service Catalog. For example, choosing the IT Services > Data Services category places the offering within this group. Offerings can have multiple categories. Click Add category to choose a category for this form. Repeat to add multiple categories. Click Edit Categories to make changes to a category. Starting in Ivanti Service Manager Release 2016.2, you can manually arrange and sort the categories. Select a category and drag it to a new location in the list. Click Save Order to save the order. For example, to move the category called HR Services to be between the categories of Application Administration and Communication Services, click on the HR Services category and drag it to the new location. Click Save Order. Now whenever anyone creates a request offering and views the list of categories, the HR Services category is listed between Application Administration and Communication Services instead of in alphabetical order. See Working with External Offerings for information on creating or modifying categories. |
| Anonymous Submit | Allows anonymous users to submit a request. |
| Hide Price information | Hides price information from users in the Self-Service Portal. |
| Hide Delivery Time information | Hides delivery time information from users in the Self-Service Portal. |
| Enable Request Cancellation | Enables the request offering to be canceled. See Configuring Editable and Cancellable Service Requests. |
| Enable Request Editing | Enable the request offering to be modified. See Configuring Editable and Cancellable Service Requests. |
| Use Price List |
Enables pricing from a global price list. See Service Manager powered by HEAT for information on how to use this feature. Enabling this option also checks Enable Financial Transaction. Do not check this option if you do not use regional pricing and do not want financial reporting. |
| Enable Financial Transaction | Tracks financial transactions for this item. The system automatically maintains a consumption history of all end users requesting this service, including pricing data. This information can be used for charge back or consumption reporting. |
| Delivery items |
The name of the delivery item. If Use Price List is checked, the value is automatically set to From Price List. |
| Deliver by | When to deliver by. Enter a number, then select the unit: minutes, hours, days, weeks. |
| Price | A price for the request item. Use this only if you are not using the price list. |
|
Recurring Price Per |
A recurring price. Select a unit from the drop-down list: month, quarter, year. Use this only if you are not using the price list. |
5.Click Next. The system displays the 2. Design request form page.
Design Request Form Page
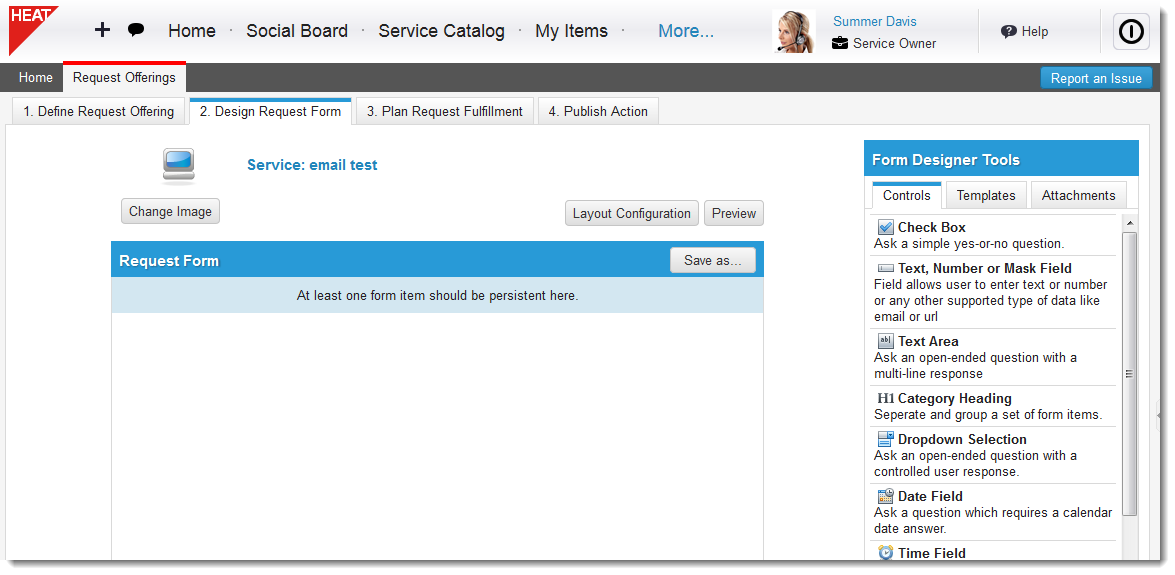
6.The system displays a default image for the request offering. To change the image, click Change Image, navigate to an image, and click Open.
•The image size cannot be larger than 50 KB.
•We recommend using square images.
•The image size can be as large as you like, but is scaled down to 48 by 48 pixels.
•See Default Icons for Request Offerings, Form Offerings, and External Offerings.
7.Click Layout Configuration to define into how many columns the fields are to be arranged on your form: one, two, or three.
Layout Configuration Window
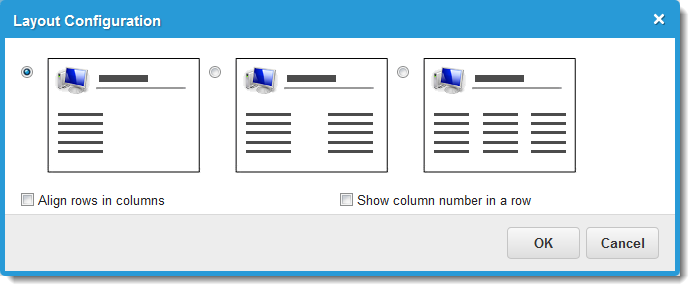
| Option | Description |
|---|---|
| Columns | The number of columns in the form: 1, 2, or 3. |
| Align rows in columns |
Aligns your rows into columns. Only useful on forms with multiple columns. Items are placed on the page from left to right into columns, then down the page. Items of different sizes can cause the layout to look jagged. This option aligns the columns of each row. |
| Show column number in a row | Shows the column placement. When you place an item on the form, an icon appears showing which column it inhabits. This is most useful when using a two or three column display. |
8.Click OK. The system closes the Layout Configuration window.
9.Drag (or double-click) control items from the Form Designer Tools pane on the right onto the Request Form area.
10.Click the edit icon  next to the control to define its parameters in the Configuration Editor:
| Control | Description | Parameters |
|---|---|---|
| Check Box | Creates a simple checkbox that users can select. Used to answer simple yes or no questions or options such as "For personal use?". |
Default Value Indent Price Field Help Visible Price Expression Read Only Unique ID |
| Text, Number, or Mask Field |
From the Type drop-down menu, you can select from the pre-configured choices to define this field to accept specific input format, such as Money, Phone Number, MAC Address, or URL.
Or select Custom to define a custom "mask". Example: To create a postal code, such as W11 2BQ, enter A00 0AA).
NOTE: For number fields, when validating the number, the system automatically sets the default value to the value of the Minimum field unless you specifically configure a default value. |
Default Value Indent Field Type Width Field Help Unique ID |
| Text Area | Allows users to enter answers requiring multi-line responses, such as a description field. |
Default Value Indent Field Type Width Field Help Visible Required Read Only Unique ID |
| Category Heading |
Allows you to create headings for various sections of your form. For example, you could have an address section, containing common address fields such as city, state, and zip. Then an equipment section, containing fields such as equipment list, problem description. Click Edit to show a dividing line or create a new page |
Dividing Line Create new page Unique ID |
| Row Aligner | Aligns a set of form items when using multiple columns. Do not check Align rows in columns from the Layout Configuration, as this overrides this feature. | No parameters |
| Drop-down Selection | Allows users to select an item from a drop-down list. You can create a custom list or use a validation list. |
Default Value Indent Field Width Field Help Visible Pick List Price Expression Required Read Only Unique ID |
| Date Field | Allows users to select a date from a calendar. |
Default Value Lower bound Upper bound Field Help Visible Required Read Only Unique ID |
| Time Field | Allows users to enter a time from a drop-down list. |
Default Value Lower bound Upper bound Field Help Visible Required Read Only Unique ID |
| Date/Time Field | Combines the date and time fields into one line. Allows users to enter a date from a calendar and a time from a drop-down list. |
Default Value Lower bound Upper bound Field Help Visible Required Read Only Unique ID |
| Image | Enables you to show an image on the form that can be triggered from another field. For example, when a user chooses an option from a list, an image appears, providing feedback. Users do not enter anything into this field. |
Indent Default Image Trigger Field Max Width Max Height Border Field Help Visible Required Unique ID |
| Upload attachments |
Enables users to upload files to the request offering. The option now supports drag and drop additions of supported file types.
Click the edit icon to open the Indent field dialog box: Use HTML 5 uploader checkbox is checked by default. Turn this off to return to legacy HTML settings. If this box is unchecked the Allow drag'ndrop will not work. Both check boxes must be checked in order to enable drag and drop functionality. Allow drag'n'drop is checked by default. This allows users to drag and drop attachments into the request offering.
The supported extensions are a subset of the allowed extensions configured in System Settings. |
Indent Field height Use HTML 5 uploader File Size Limit File Number Limit Supported extensions Can copy data from clipboard Allow drag'n'drop Field Help Visible Required Unique ID |
| Read only text | A label or description. Users do not enter anything into this field. |
Default Value Indent Do Not Submit Field Help Visible Unique ID |
| List | Allows users to select an item from a scrollable list. You can create a custom list or use a validation list. See Service Manager powered by HEAT for how to configure this control. |
Default Value Indent Field Width Field Height Allow single selection Image Width Image Height Field Help Visible Pick List Price Expression Required Read Only Unique ID |
11.Click the control title and enter a name for the control.
For example, if you have used the Date/Time Field, you could name the control Appointment.
Sample Control Name

12.Click Type Description Here, then enter a description of the control.
13.To designate the number of columns the form has, click Choose a Style.
Choose the Number of Columns

14.Optional. Choose a template from the Templates tab.
15.Optional. Attach images to be used with the List and Dropdown Selector controls from the Attachments tab.
Files should be uploaded before adding the control. See Adding Images to the List Control.
16.Do one of the following:
•Click Preview to see how your form appears to users.
•Click Save to save the form without publishing, allowing you to work on it later.
•Click Save & Exit to save the form and return to the request offerings list.
•Click Review to see how the Review form appears.
•Click Close to close the Preview window and continue designing the request offering.
17.Click Next. The 3. Plan Request Fulfillment page appears.
•You cannot edit the workflow if the production metadata is in read-only mode. When this happens, the system displays a message.
•For more information about setting the production metadata to read-only, see the Configuration Database Guide for Ivanti Service Manager.
18.Next to Fulfill as, select a fulfillment option from the drop-down list.
| Fulfill Option | Description |
|---|---|
| No Fulfillment | No fulfillment action occurs for this request offering. |
| An email form appears. Enter the information as required. |
|
| Workflow |
Creates a workflow in the Workflow Designer. You can define a multistep fulfillment workflow with the Workflow Designer. The designer supports the inclusion of all required approvals and fulfillment tasks. If financial approval is required, include an approval block dedicated for financial approval. |
19.Click Next. The system displays the 4. Publish Action page.
20.Select the action to perform when saving this request offering:
| Action | Description |
|---|---|
| In Design | Saves the form without publishing it to users. You can modify this form later. |
| Published | Saves the form and makes the request offering available under request offerings, but not under the Service Catalog. When setting this status, by default the organizational unit of the creator/owner is added with all permissions checked. This offering is available in the Service Catalog for this organizational unit unless modified. |
| Org Unit | Selects an organizational unit from the list. You can only publish request offerings to organizational units to which you have access. For example, if you do not have access to the entire organization, your published offering will only be available to users in the organizational unit that you have selected and below. |
| Location | Only publishes to specific locations. You can designate multiple locations. |
|
Permissions |
|
| Submit | Allows this request to be submitted from the Service Catalog by the designated organizational unit. |
| Edit | Enables users within the organizational unit to modify the request offering (not the resulting service request). |
| Delete | Enables users within the organizational unit to delete the request offering (not the resulting service request). |
| Copy | Enables users within the organizational unit to duplicate the request offering (not the resulting service request). |
21.Optional. Click the delete icon  to remove the organizational unit from the list.
•The request offering owner/creator has edit permissions by default.
•You can only publish to an organizational unit to which you belong, and its parent and child units.
22.To finish, do one of the following:
•Click Save to save the file and publish.
•Click Save and Exit to save the file without publishing. You can make changes to the request offering or delay its publication.
•Click Cancel to dismiss the page and delete all your selections.
Was this article useful?
The topic was:
Inaccurate
Incomplete
Not what I expected
Other
Copyright © 2017, Ivanti. All rights reserved.